All posts by RegistrarTrek

Museum professional, lover of all collections work, former collections manager of the TECHNOSEUM in Mannheim, Germany. Now Professional Services Specialist for Gallery Systems. Independent museum professional. Cat wrangler and #SciFi enthusiast. Views are my own. Of course, they are. I can't make anybody responsible for the garbage my brain produces!

Failures in Figures – Sloppy Location Tracking Part 2

The damage sloppy location tracking does

wantedI promised to take a look at the damage done by the errors recognized in the first part.
Note: All the working time given in minutes are estimations based on real-world experiments and consider closely related working steps like, for example, that to check a rack in compact storage you need time to pull the rack out and move it back in after checking or that you have to take a sign out of a box and place it on a table when checking signs stored in a box – and that you have to put back all of them safely after checking. It does not take into account the time invested into collections improvement like cleaning, packing badly packed objects better or correcting false data base entries when you discover them while searching for that sign.

Those who believe wrong location entries don’t do a considerable damage normally have misconceptions about the museum work behind the scenes. Their reasoning goes as follows: if an object is missing, you mark it missing in the data base and carry on with your work. Their calculation is:

Going to the location stated in the data base to look for object, search for it, don’t find it there:
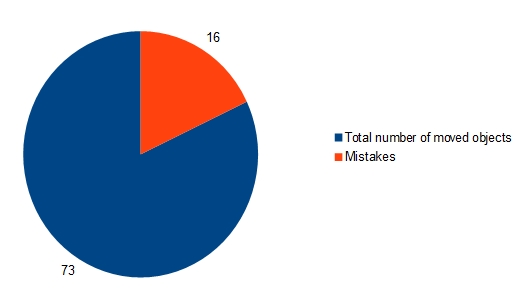
3 Minutes (assuming that “Every object is retrievable within three minutes”, one of the core principles of RE-ORG methodology for museum storages, see http://www.re-org.info/ for more)

Marking the object as “missing” in the data base:
1 minute

4 minutes working time wasted.

But that’s not the reality. Objects that are searched for are needed for something, may it be an exhibit or research. This means that when you can’t find it there is a whole procedure of searching taking place. How much time is wasted depends on your setting and object handling procedures. Let’s say the normal setting is that the curator searches for most of the objects he or she needs for an exhibition him- or herself. Only when he or she has trouble finding something he or she contacts the collections manager. What will happen in this setup?

The curator searches for the object at the location stated in the data base:
3 minutes

The curator searches in the direct vicinity of the location to make sure it really isn’t there and he or she hasn’t just overlooked it.
10 minutes

The curator checks the data base again to see if he or she really looked at the right location
1 minute

The curator contacts the collections manager to inform him or her about the trouble in finding the object
5 minutes

The collections manager searches the location given in the data base and its direct vicinity again to make sure the curator hasn’t overlooked something
13 minutes

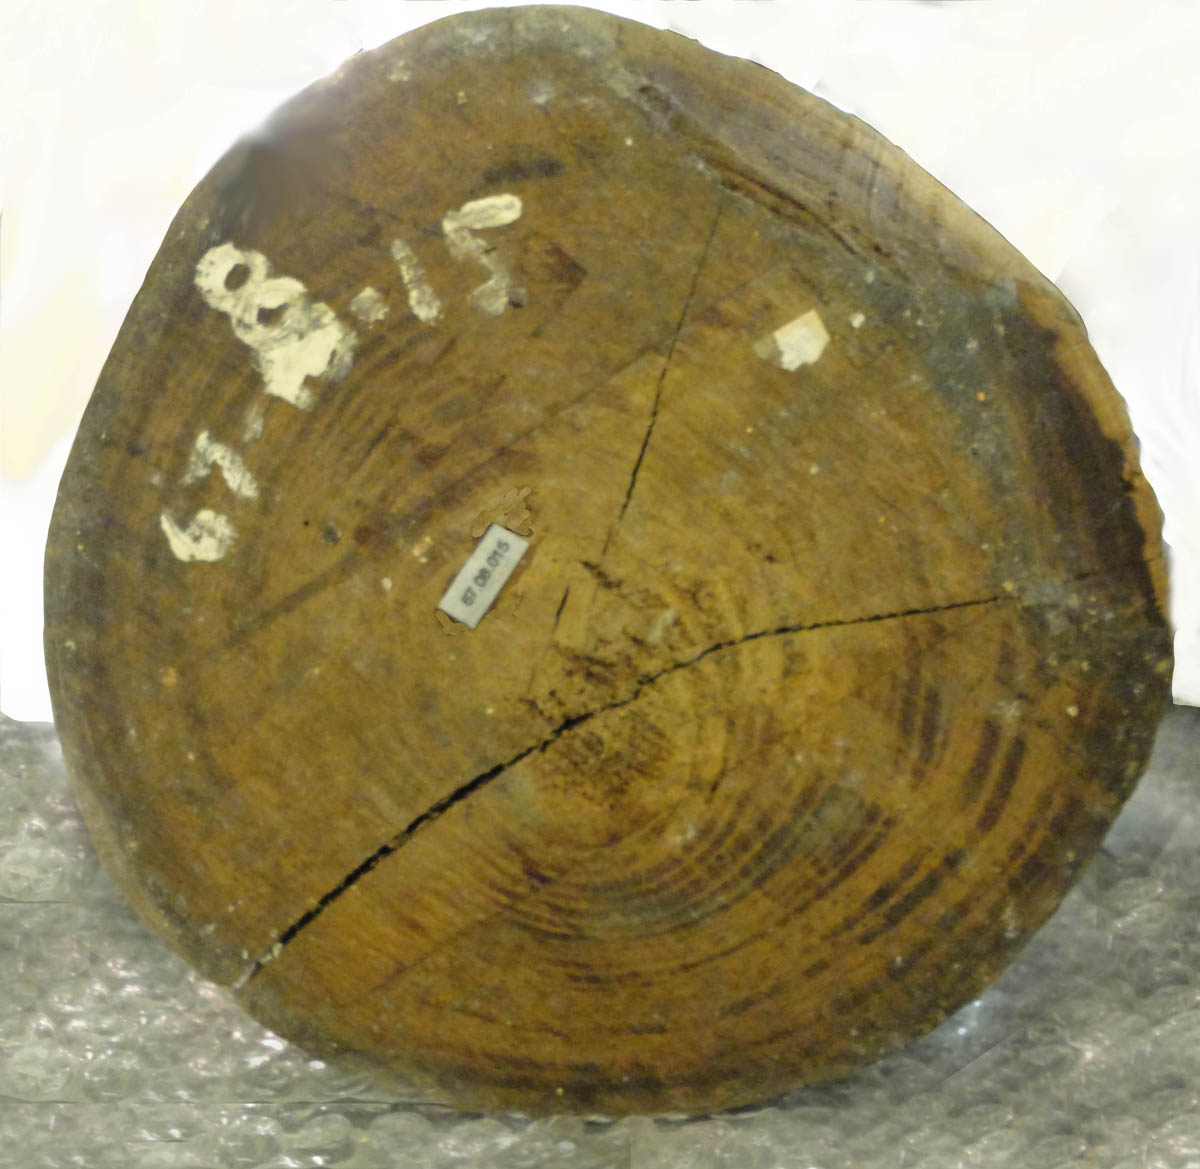
The collections manager takes a look at the object entry in the data base to see if he or she can figure out what went wrong. This means trying different combinations of confused numbers to see if it produces results that show the location of the sign. For example: if 1988.1243 and 1989.1243 are both enamel signs and 1988.1243 can’t be found at the location entered in the data base it might be found on the location that is given for 1989.1243. This might also encompass searching for previous uses of the sign to figure out if it was taken out for a loan or a conservation treatment which wasn’t noted in the data base by mistake.
30 minutes

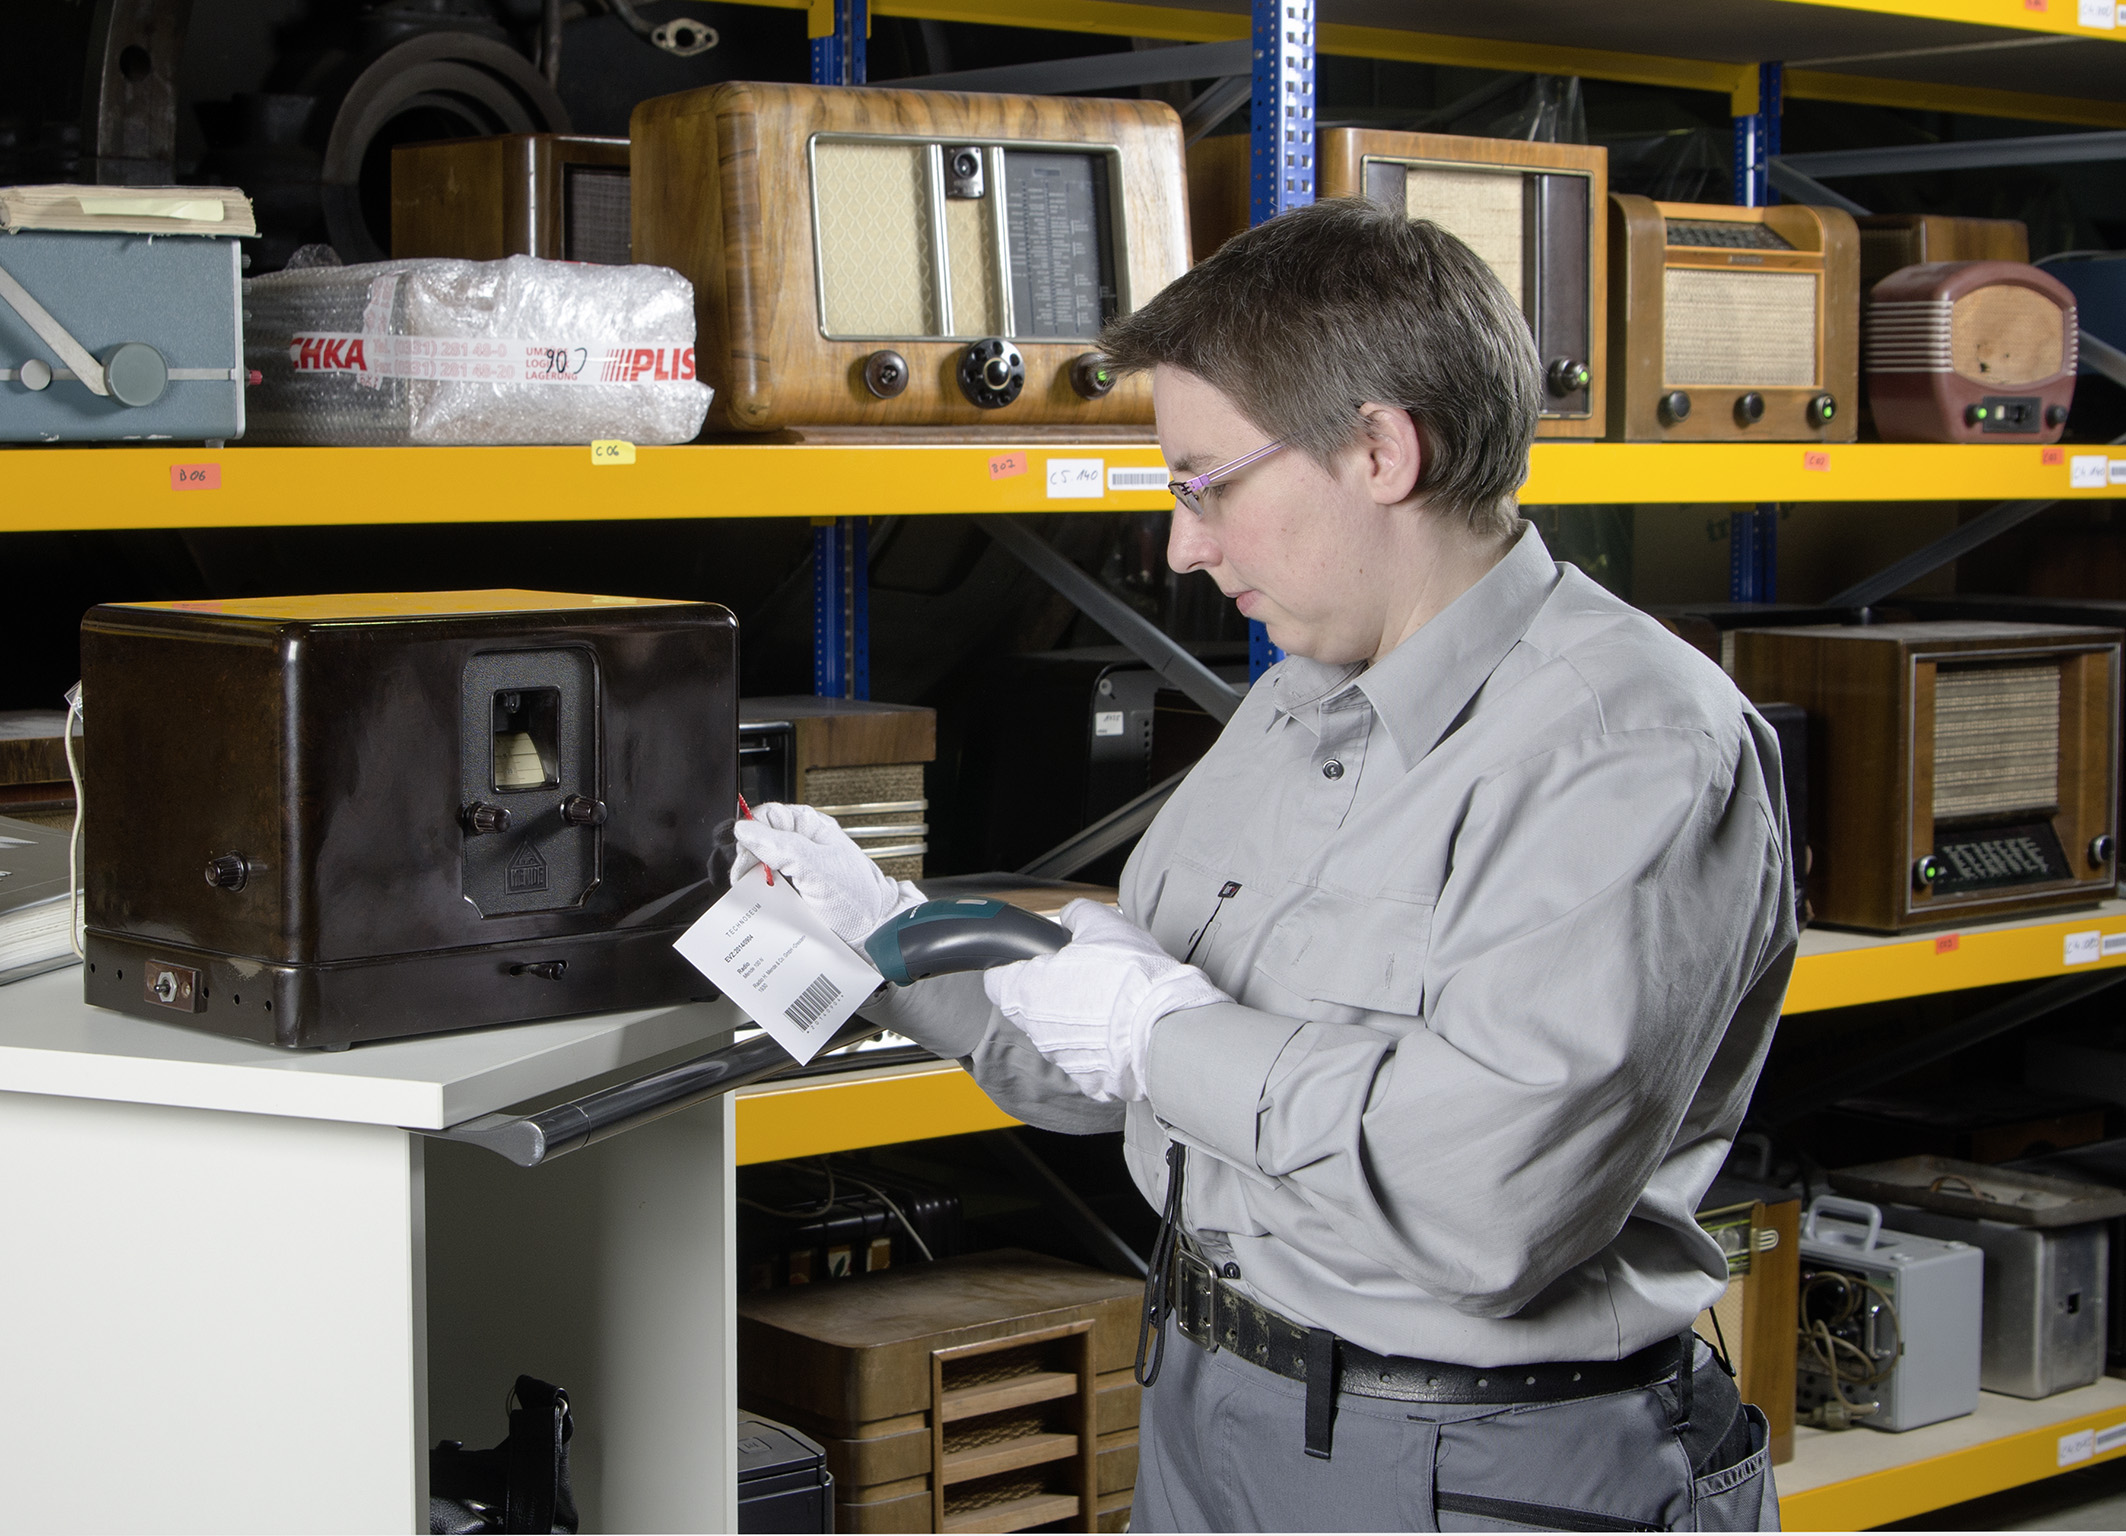
The collections manager searches all objects of the same type to make sure the object really isn’t there. How long this takes is mainly due to the object type, storage situation and the quality of the overall museum documentation. If enamel signs are all stored in one place without exemption this is easier and quicker to check than if they can be found at various storage locations. If all enamel signs hang open and visible in compact storage they are easier to search than if they are all wrapped in bubble wrap. If they hang wrapped they are easier to search than if they are crammed into open shelving or boxes. If the bubble wrap has a printed out picture of the sign on it it is easier to search than if the wrap only carries the number.
Well, we have about 750 enamel signs. Let’s say we can narrow this sample down to 200 if we take the size as quick criteria what signs we have to check and which we don’t have to check. Here is the time it takes to check in all already discussed scenarios:

Compact storage (assuming that one rack holds 20 signs that are hung open or are wrapped but have a big printed picture in front and that you have a picture of the sign you search for):
4 minutes per rack = 40 minutes

Compact storage (assuming that one rack holds 20 signs that are wrapped and clearly signed with the accession number):
7 minutes per rack = 70 minutes

Open shelving or boxes (assuming that one shelf or box holds 10 signs):
15 minutes per shelf = 300 minutes

It’s astounding to see the increase of working time that comes with not ideal storage conditions. The time given for storage in boxes or open shelving in this scenario is still kind of ideal: the working time invested increases even more if boxes have to be moved with a pallet truck or a forklift, if the signs are not all stored in one place and if location entries are vague. Of course, sometimes you won’t have to search through all the 200 signs to find the right one. On the other hand, Murphy’s Law is still in place, so it might well be that the sign you search for is the last sign that you check. And: signs are rather easy to search for, compared to a missing coffee maker in a collection of 200 coffee makers in 18 shelving units, presumably all wrapped in nice bubble wrap and just labeled with accession numbers. Still a doable task, assuming that all coffee makers are stored together. It becomes “mission impossible” if every single nicely wrapped package in 400 storage units could hold the missing item.
Well, back to our figures…

The collections manager is changing the location entry if he or she has found the object or marks it as “missing” in the data base:
1 minute

The collections manager informs the curator if the object was found or if it is missing
5 minutes

In the worst case the object can’t be retrieved despite all efforts and this leads to even more invested working time by the curator who has to search for a replacement. Along with the increased research time this might even result in additional costs like shipping fees if he or she needs to borrow the replacement from another institution or traveling costs if he or she has to travel to another institution for research. But let’s just take stock here:

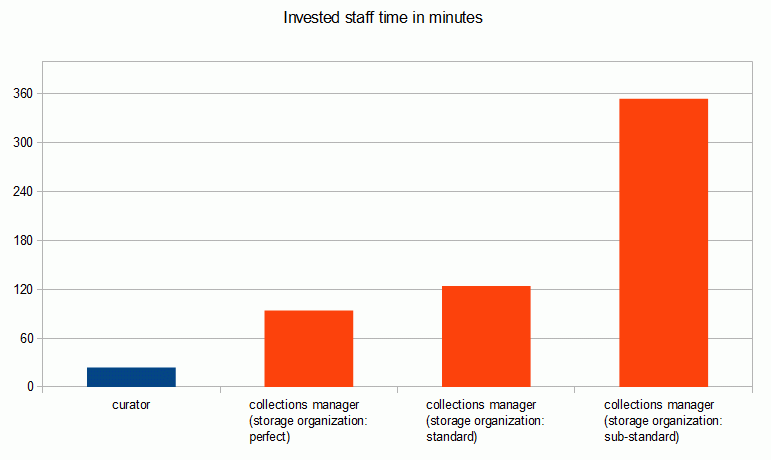
Invested working time curator (the information exchange between curator and collections manager is counted for both):
24 minutes
Invested working time collections manger in a perfectly organized collections setup:
94 minutes
Invested working time in a standard collections setup:
124 minutes
Invested working time in a sub-standard collections setup:
354 minutes

This means that even in a well-managed setup a wrong location entry leads to about 2 hours of invested staff time.
invested time
Which brings us to the question how often this happens. Upper management will normally assume that this is the exception, not the rule. They reason that their collections managers are detail-oriented and dedicated staffers who will have their collection well organized so these failures are certainly not very common. On the other hand, many collections managers will probably tell you “it happens EVERY time!” So, which assumption is right? Well, they are both right and both wrong. If we take a look at the figures from our first part we got an error rate of 21,91 %. As we only look for objects that were not found on their location we can neglect the “wrong picture” case (although this could make the retrieval process more complicated) so our error rate becomes 20,54 %. If we assume for a moment that this percentage is common in other collections, too, this means that there is something wrong with the location entry of every fifth object. In other words: if you get a list of 15 objects to retrieve you will have difficulties with finding 3 of them. Of course, this isn’t inevitably so, but it explains why many collections managers think of it as something that happens EVERY time as it possibly happens with at least one object in every task they get on their desk.

So, are most collections managers not as detail-oriented and dedicated as upper management thinks? Is our self-perception that we are of course detail-oriented, sometimes in an obsessive-compulsive way, so completely wrong? Are we really that sloppy? Or are there reasons other than carelessness responsible for the figures we just saw? We’ll take a look at that in the next part of our series.

Failures in Figures – A Series with Real-World Examples and Real Data

Nowadays everybody seems to be obsessed with numbers. Big Data, KPIs, ROI, people like to count and somehow they believe that only if they have counted enough numbers they can make sense of what’s going on. Recently someone asked how many artifacts are needed to justify a curator’s position. People ask ”How many artifacts does your collection hold?” as if this information says anything about how significant or valuable the collection is or how good it is cared for. Data base entries done to achieve unrealistic “objects per day/month/year” goals instead of focusing on the quality of the entries let me bang my head against the wall pretty often.

I could argue for hours about what is wrong with those approaches but I guess you, our readers, could do it just as well. Instead, I tried to look at it from a different angle: We, the collections people, deal a lot with data every day. One could say that data is nearly our native tongue. But so far we let other people, less fluent in this language, dictate which figures are important and what they tell us. So today, I start a series based on common collection issues that I can make visible using real data. I will present the figures and then analyze what they tell us.

Part 1: How bad is being a little sloppy with location tracking, really?

Recently we were improving the storage situation for some of our tin plate and enamel signs. This is just one of these situations where you stumble upon a set of very different common storage mistakes: confused numbers, wrong data base entries, missing locations… In fact, those relocation projects, following a stringent procedure of taking everything out and checking it against its data base entry are sometimes the only occasions where you have a real chance to discover objects that were marked “missing”.

total_mistakes
Those are also projects where you sometimes encounter “time saving” ideas like “but they are all in the data base, can’t we just take them to their new location and change the location entry in the data base without cross-checking?” It’s sometimes not easy to argue against such ideas – until you have figures that tell you why it isn’t exactly a good idea. So, let’s take a look at the figures:

We moved 73 signs in one day. During the check we encountered the following issues:
9 signs had a wrong location in the data base. Sometimes it was an “old” location, where the sign had been before, because someone had forgotten to mark the location change in the data base or because he or she confused the accession number and made the location change for a totally different object. Sometimes the location was plain wrong because someone choose the wrong entry from the location thesaurus or, again, confused the accession number with another object.
2 signs where marked “missing” in the data base, which means that somebody already tried to find them. They were discovered when unwrapping a sign and discovering that there was a second sign packed within. One of the two had no accession number attached but could be identified later.
4 signs had a wrong accession number attached, although most of our object labels (and, in fact, all 4 labels in question here) bear pictures.
1 data base entry showed the wrong picture.

This translates into an error rate of 21,91 % which means that there was something wrong with every 5th data base entry.
Wrong location entries top the pile with 12%, followed by confused accession numbers with 5,48%, “missing” objects with 2,74% and wrong picture with 1,37%.

mistakes

In the next parts of this series we will take a look at what led to these errors, how they could have been avoided and how this translates into invested working time.

Part 2: The damage done by sloppy location tracking

Where’d It Go?

TECHNOSEUM utilizes barcodes to track collections

Simple and effective inventory control: Most of the radio collection has already been barcoded. TECHNOSEUM, photo Hans Bleh
Simple and effective inventory control: Most of the radio collection has already been barcoded. TECHNOSEUM, photo: Hans Bleh
When things disappear in museums, everyone’s first thought is of break-ins or theft. Museum objects do disappear on a daily basis, but the reason they do is usually more mundane: the object was removed for exhibition, loan, or conservation. Changes in location are usually tracked in a database, but the system has one weakness: a human being enters the object number into the database and notes its new location. One transposed numeral and suddenly it’s the coffeepot instead of the typewriter that’s gone to the conservation lab, though the pot never really left its location in storage. The mistake usually goes unnoticed until an object is urgently needed but can’t be found where the database says it should be. When thousands of objects are moved each year, as they are at the TECHNOSEUM, errors in location management are a serious problem. The obvious solution is to make the object numbers and locations machine-readable, eliminating the potential for input errors.

Barcode or RFID?

As with every practical issue, there is an abundance of technical know-how on the one hand, versus concrete local limitations on the other. Something that makes sense in one museum might not in another. At the TECHNOSEUM, we first considered several possibilities in an open and unbiased manner, starting with barcodes. Most of us know these as the striped codes on packaging in stores, or as blotchy squares of code in ads or magazines commonly known as QR codes. Next we considered RFID chips, which are usually associated with anti-theft devices or animal tracking. We also got in touch with colleagues around the world, who are already using these systems in their museums and were able to give us a great deal of insight into their problems and potential. We weighed this information against our own local conditions and decided to go with the striped barcode.

By the People, For the People

Inventory card on a “Einstein Beer Tankard,” one of about 100 examples in the collections. A special exhibit on the topic “Beer” will appear at the TECHNOSEUM in 2016. TECHNOSEUM; photo Hans Bleh
Inventory card on a “Einstein Beer Tankard,” one of about 100 examples in the collections. A special exhibit on the topic “Beer” will appear at the TECHNOSEUM in 2016. TECHNOSEUM, photo Hans Bleh
We knew from the start that we would not be affixing the barcodes directly on the objects. Only the object number goes directly on an object. The barcode is part of the a laser-printed polyethylene film inventory card associated with each object at the TECHNOSEUM. The barcode on each card is merely a conversion of the object number into a machine-readable form. The same is true of the barcodes that designate storage locations: they are not arbitrary numbers, but rather a simplified version of our alphanumeric location designations.

This kind of conversion has many advantages:
• Collections staff can continue working even when the scanner system is not working. People can still read all numbers and find the locations.
• Barcodes can be implemented gradually, parallel to older inventory methods, with no workflow delays when objects or locations have not been barcoded yet.
• With the low number of characters, the capacity of the classic barcode is sufficient and cheaper readers can be used.
Work on Site and in the Database
The barcode scanner works just like a keypad or mouse. When a barcode is scanned, our database (Faust 7) displays the associated record, which can then be edited. If the object’s location is to change, we scan the location barcode directly from the storage unit itself or from a list at the workstation. The barcode readers we use at the TECHNOSEUM work over a wireless network. They also have a memory function, so barcodes outside the range of the receiver can be scanned and then uploaded back at our work stations.

Implementation: From Zero to 170,000?

At first, implementing a system like this might seem like a mammoth undertaking. After all, eventually all of the TECHNOSEUM’s approximately 170,000 objects are to sport “their” barcodes. The simple directive “Everything you touch gets a barcode” makes the reality of implementing the system much less daunting. Since February 2015, every new acquisition has received its barcode as soon as it enters the collection. And every object loaned, photographed, audited, or restored gets a barcoded tag—that’s between 4,000 and 6,000 objects annually. Every object in the database already has a barcode, which automatically appears on every newly printed inventory card, packing list, and box label. Any hours our part-time student assistants have to spare are spent providing entire storage units with new inventory cards. The barcodes have withstood their first baptism by fire: the deinstallation of the “Herzblut” (Lifeblood) exhibition. About 600 of the 700 objects on display came from our own collections and were packed up and sent back to storage in June. For the first time ever, thanks to the barcodes, there were no “blind spots” in the logistics chain: every object could be found at any point in time, whether in the exhibit vitrine, the numbered packing case, or back in storage. And another first: Never in the museum’s 25-year history had an exhibition been deinstalled without a single transposed numeral—until now!

Angela Kipp

This article was originally published in KulturBetrieb, (Cultural Enterprise) a magazine for innovative and economic solutions in museums, libraries, and archives; issue 3 (August 2015). www.kulturbetrieb-magazin.de

Abbreviations and technical terms employed:

RFID (English abbreviation for “radio-frequency identification): identification using radio waves.

Translated from German into English by Cindy Opitz

New Digital Publication Now Available!
Rights & Reproductions: The Handbook for Cultural Institutions

by Anne M. Young
Manager of Rights and Reproductions
Indianapolis Museum of Art

Last week Rights & Reproductions: The Handbook for Cultural Institutions was published by the Indianapolis Museum of Art and American Alliance of Museums. Read the official press release here: http://www.imamuseum.org/sites/default/files/attachments/RR%20Handbook%20PR%20FINAL.pdf. After two years of in-depth work on the Handbook, it is my great pleasure to see the efforts of so many people come to fruition and be released to the public. As I have taken to calling the Handbook, my third “child” has now been born—a bouncing baby ePub.

Cover design for the publication. Artwork depicted: Edward Hopper (American, 1882–1967), Hotel Lobby (detail), 1943, oil on canvas, 32-1/4 x 40-3/4 in. Indianapolis Museum of Art, William Ray Adams Memorial Collection, 47.4 © Edward Hopper.

The Handbook is the first publication available to rights and reproductions specialists that focuses solely on the guidelines, established standards and emerging best practices in this field. As defined in the Handbook, a rights and reproductions specialist refers to anyone working at a cultural institution who handles this type of work, including but not limited to registrars, rights and reproductions managers, archivists, librarians and lawyers.

Writing, editing and designing Rights & Reproductions: The Handbook for Cultural Institutions has been, relatively speaking, the easy part. The true “work” has been the coordination of all the moving parts associated with its production. Getting the IMA and AAM in line as the publishers, bringing together over 20 contributing authors and legal review panelists, the IMA’s receipt of the National Leadership Grant from the U.S. Institute of Museum and Library Services (IMLS), and the Getty Foundation’s support of its production as a digital publication utilizing the Online Scholarly Catalogue Initiative (OSCI) Toolkit are the only reasons it is now available for purchase. As one of the contributing authors recently quipped, “Anne, you are now awarded the title ‘Champion Cat Herder,’” which I humbly accept.

Highlights or stats, if you will, of the Handbook include, but are not limited to, the following:

  • Over 400 “pages” of text and almost 800 footnotes (just four shy, which is simply annoying).
  • An overview of Intellectual Property (IP) law, ethics and risk (in the United States) and other personal, moral, and third party rights compared with the broad differences found in international IP rights.
  • Discussion of the importance of maintaining an IP policy, considering open access policies and conducting regular IP audits.
  • 50 references each to Creative Commons and open access and over 170 references to fair use and/or fair dealing.
  • Rights issues in permanent collections: determining the rights status of collection objects, identifying rights holders and preparing non-exclusive licenses.
  • Use of materials with IP considerations, including, but not limited to, publications and exhibitions, educational materials, websites and social media, marketing and promotion, and retail and commercial products.
  • Varying processes employed for clearing permissions and sourcing materials, as well as when a utilization of fair use is appropriate and the types of attribution required.
  • Over 20 case studies that outline real-world examples from the contributing authors’ experiences and practices at their respective institutions.
  • The process of expanding audiences and potential revenue generation by leveraging collection content with external distribution partners.
  • Analysis of communicating IP to the public, including licensing materials to external users and the evolution of photography policies.
  • Direct hyperlinks to external sources and related articles within the footnotes, appendices and bibliography as well as embedded video files.
  • Four appendices: international treaties, federal legal materials and court decisions; document and contract templates (over 100 pages!); terms and definitions; and references and resources.

If you haven’t already, I encourage you to skip the morning stop at the coffee shop and purchase your copy of Rights & Reproductions: The Handbook for Cultural Institutions. Available now for purchase through AAM’s website at https://aam-us.org/ProductCatalog/Product?ID=5186 for $4.99 USD (non-members and Tier 1 members) and $1.99 USD (Tier 2 and 3 members).

r&r-logos5

Rights & Reproductions: The Handbook for Cultural Institutions is made possible by a grant from the U.S. Institute of Museum and Library Services. The project utilizes the OSCI Toolkit, which is supported by the Getty Foundation as a part of its Online Scholarly Catalogue Initiative.

How NOT to number objects

It all started on an early Friday morning when I opened a box and found a cast iron plate with its accession number as well as object title and year or production written down on a post-it and the post it secured all around with adhesive tape. I found this both horrific and hilarious, so I shared my experience with my colleagues at the RCAAM listserv (http://www.rcaam.org/Listserv). Apparently, I was not alone. Here are the experiences our colleagues shared:

  • I remember working on an object where the accession number was painted over the original manufacturer’s label.
  • That sounds like the types of things I witnessed when I first started at my job! My predecessors didn’t know how to accession anything or where to write the numbers. Some of the beautiful frames have the accession numbers written on all 4 sides in giant sharpie letters. It is horrific!
  • And then there was the fine 19th century linen handkerchief with the number written in 1/2” high characters in red nail polish directly on the fabric. Still makes me teary-eyed to think about that one.
  • 1880’s playing cards with white paint and ink numbers
  • I actually saw a director of collections where I used to work write an accession number with a large black sharpie on a cardboard hat box!!!
  • Sharpie marker on unglazed ceramics…
  • Another example of stapling the tag to the textile
    Another example of stapling the tag to the textile
    Stapling the tag to fur collar instead of sewing in the tag.
  • Sharpie on Duct tape wrapped around 19th century leather-bound books (to prevent them from opening).
  • Wow – you had the fancy Sharpies. In my museum previous staff had to make do with the inferior Marks-A-Lot brand for marking cardboard and silk.
  • I’ve got red oil paint on unglazed ceramics. Does size count? The numbers are about 3/4″ tall…
  • How about paper tags written in pencil that’s completely faded after less than five years?
  • Many of our older paintings are victims of the old “red nail polish” method….
  • One place I worked had numbers written in sharpie marker on nearly every object in the collection. In addition, the number written object often did not match what was listed in the Accession Book, e.g. different year.
  • Many of the documents in our archive are labeled with a layer of clear or white acryloid, then the number written with an archival pen, then sealed with another layer acryloid… it still puzzles me every time.
  • The university administration used to keep track of “items” by assigning property numbers, sometimes with metal plates on the objects. Fortunately, we no longer do this. Yes, we are learning…and we are a learning institution.
  • At a museum I worked at years ago I had a parchment land document from the 1770s numbered on the front, in large letters, in blue ballpoint pen. And the person made sure they pressed really hard, and went over the numbers many times to make sure it was really on there.
  • I found a box stuffed with artifacts. Some in (too large) plastic bags, and one pair of boot moccs (not old, very, very modern). Someone wrote on the plastic bag with sharpie, didn’t let it dry and put all bags and unprotected moccs in the box…well the sharpie ink rubbed off on the moccs. Backwards object number at the top.
  • I have seen a lot of ink in books, well paper in general. And just not numbering at all….
  • We see things constantly that were done 50 or more years ago and it just makes us shake our heads a bit. Here are two of my favorites.

    1. With metal tools, I’ve seen pieces where someone ground away a noticeable amount of metal (enough that it changes the shape of the artifact) to make it smooth, then used a rotary tool to incise the numbers into the surface.

    2. You know the plastic tape that you emboss numbers into with a little hand punch? I’ve seen that directly stuck onto artifacts and on top of that, stapled into the surface on each end. The adhesive is so strong that it can’t seem to be removed without risk of damage, so I usually just leave it when I see it.

    You find some interesting things with a 100+ year old collection!

  • How about carved inside a wood mask? I can say this was not done by anyone claiming to be a museum professional. It was done by the donor in an effort to keep an inventory of the collection. As you can see from the photo, hanging hardware was included for no extra charge. Lucky me!
    How about carved inside a wood mask? I can say this was not done by anyone claiming to be a museum professional. It was done by the donor in an effort to keep an inventory of the collection. As you can see from the photo, hanging hardware was included for no extra charge. Lucky me!
    Our office of inventory control for the university still assigns property numbers, but a long time ago someone explained to them that actually putting them on the art would damage it. Now they just send us the tags which I place in the object file.

    When I first got here I found it amusing that when inventory control did a random inventory of the museum they didn’t want to see the object, just the tag. In the past few years this has changed and they now want to see both. I am so appreciative that they really seem to care about our collection and want to make sure we’re taking care of it.

    As funny as all of these things are, we should remember that at some point people thought they were doing the right thing with their marking. I wonder what future registrars will be saying about us in 50 years…

  • This is not related to numbering objects specifically but…we received a donation of books, photographs, and other ephemera from a donor many years ago that are now a part of our archive. I suppose it was done to identify who owned the work and/or for posterity but the donor stamped everything with an Ex Libris ink stamp that also includes her name. Most of the works have been stamped multiple times in different places (front, back, inside cover). And in many cases (a pet peeve of mine) the stamp is upside down…
  • We ran into a similar situation at the Thomas Wolfe Memorial in Asheville, but with signatures. Thomas Wolfe owned several books that are in the collection and signed them on the flyleaf. After his death, one of his sisters went through the books and wrote “Tom wrote this” and drew an arrow to his signature.
  • I’ve got 45 year-old ball-point pen on masking tape fossilized onto hundreds of pieces accessioned in the early 1970s…
  • At The Farmers’ Museum in Cooperstown, New York, some industrious soul in the 1940s used a pot of red paint and a small brush to place accession numbers on many three-dimensional objects. Because of the ancient staff person’s lack of skill in that endeavor, he or she has traditionally been identified as the Red Blobber. Finding the number on the object is never a problem, but differentiating a 5 from a 6 or an 8 or a 9 (ad nauseum) can be impossible.
  • I also recall a tale from the late Caroline Keck, regarding numbers painted on hundreds of archaeological metal items that were being catalogued and placed in climate-controlled storage. The rapid drying of the corrosion layers caused almost all the objects to shed their outer layers… along with the numbers.
  • I worked somewhere once where most of the objects had been numbered multiple times, with a variety of numbering systems in a variety of sizes and materials. We used to play “can you see it now” and hold up the items to see how far away one could read the numbers…
  • Great topic and could be a chapter of a book. This is my personal favorite. If the black 1.5″ lettering isn’t legible the White 1.5 lettering should be. Whatever they used as a clear coat has so far resisted any attempt at removal. I have thought of sand blasting but I think the metal might disappear before the clear coat did (only a little bit of gallows humor here).
  • The plague of Mad Number-ers also scourged the woodlands. We have evidence like the above parti-colored markings. On some objects the number is also etched, sometimes with an etching tool, sometimes with a sharpened nail.
  • Cupboard
    Someone, long, long ago, must have found a sale on house paint. Several of our objects look like the pics I am attaching.  The second shows the bottom of a totem, you can see my little number in the center, as well as the yellow painted number I found on it. I just had to re-number it myself to indicate my disgust at the first method. At least they could have gotten the number right the first time (you'll see it is marked out and rewritten, as if one go-round with paint wasn't enough - sheesh!!).
    Someone, long, long ago, must have found a sale on house paint. Several of our objects look like the pics I am attaching.
    The second shows the bottom of a totem, you can see my little number in the center, as well as the yellow painted number I found on it. I just had to re-number it myself to indicate my disgust at the first method. At least they could have gotten the number right the first time (you’ll see it is marked out and rewritten, as if one go-round with paint wasn’t enough – sheesh!!).
    Good to know we’re amongst friends! Here are some of our past sins…sharpie, red nail polish method, yellow nail polish method, metal etching, metal stamping, ball point on paper artifacts, white out (literally numbers painted on with white out), multiple numbering systems labeled on an artifact, stapling tags into textiles, masking tape labels, metal tagging…numbers of various shapes and sizes…I think we may even have some neon painted
    numbers…sigh.
  • I am so, so pleased that my institution is not the only one that has a history of using those old plastic label makers! Our intrepid predecessors were apparently afraid that we would be unable to identify the purpose of the artifacts in the future, and so they gave us plastic adhesive labels with things on them like “Wooden Bowl” and “Butter Mold.” Right on the front of the artifacts. Those poor bowls didn’t stand a chance.
  • Actually, I forgot one of the most diabolical numbering applications. Years ago, a previous NC State Historic Sites curator instructed staff at historic sites to write accession numbers on adhesive labels and put them on the objects. Through the years, the labels have dried up, fallen off of many of the artifacts, and then dutiful staff swept them up and disposed of them. Not only do we now have a sticky shadow of where the label was, we’ve been hard-pressed matching records and artifacts–thanks to poor measurements and descriptions. But that’s another story. [sigh]
  • Before I started to work here we had a former director who had the staff use silver fingernail polish as a base with the accession number written on with a red Sharpie pen. This was followed with a topcoat of clear fingernail polish. Over the years these numbers have faded so much they are almost impossible to read. Or, if it wasn’t silver fingernail polish it was White Out.

    This same director also liked to take the eraser on the end of an ink pen (remember those?) and “clean” a spot on coins before marking them with a number.

    One more – when the collection was still at the college a retired professor became the director. He decided everything needed to be clearly marked. He would paint a large white blob on the artifact and use India ink to put on a number followed by shellac that often ran down the artifact. This was usually in the most conspicuous and prominent place on the front of the artifact and the size never varied. It was always HUGE! Sometimes he added two or three more examples of the same exact number to the piece. We have a beautiful polychrome Zuni Pueblo pot that has a number painted on over some of the designs. The shellac then ran all the way down the sides of the pot.
    Oh the humanity!

And the winner is…

Three days after my original cry came an answer we all declared as the ultimate winner:
“At a previous institution, a human skull with the accession number dutifully written in black pen across the middle of the forehead sometime during the previous century. And this was an individual that we repatriated.”

But what is it called? Nomenclature 4.0 is here to help you!

Using the right terms is crucial for good museum documentation, the foundation for professional museum work. We have discussed this a couple of times in the past. Now I’m really happy that Nomenclature, the standard work for naming objects correctly in historical museums in the U.S. sees its fourth edition. Those of you who ever had to discuss with colleagues if it’s an adjustable spanner or a monkey wrench (which gets even worse in German where the same tool is called “Englishman” or “Frenchman” depending on the region in addition to about four “normal” terms) will know why having a controlled vocabulary is a blessing. I asked Jennifer Toelle to tell us a little more about the new edition:

nimnclatureNomenclature 4.0 is the most up-to-date print edition of one of North America’s most popular controlled vocabularies for classifying and naming objects in historical museums. Building on professional standards and a hierarchical structure introduced in the last edition, Nomenclature 4.0 features expanded coverage and revision by reflecting new research and contributions by museum professionals throughout the United States and Canada.

For over 35 years, Nomenclature has offered a practical, flexible framework to ensure museum documentation, retrieval and data sharing is more consistent. This system remains a standard cataloging tool for thousands of museums and historical organizations. Nomenclature serves museums by providing a system designed to consistently name objects and facilitate sharing information with staff and researchers, other institutions, and the public.

Nomenclature allows catalogers to assign names to the artifacts / objects within their collection consistently and accurately. Much like plants are grouped and categorized by family, genus and species, Nomenclature groups items in hierarchical levels based on object function. Thus, objects originally created to be used as toys or to carry on the activities of games, sports, gambling, or public entertainment are grouped in one category (Category 9: Recreational Objects) while those items originally created as expressions of human thought (for example, art, documents, religious objects,) are grouped in Category 8: Communication Objects.

The lexicon has ten categories covering all aspects of human-made objects ranging from Built Environment Objects, Furnishings, Personal Objects, Tools and Equipment for Materials, Tools and Equipment for Science and Technology, Tools and Equipment for Communication, Distribution and Transportation Objects, Communication Objects, Recreational Objects and Unclassifiable Objects. Each category is then divided into classifications and sub-classifications with Primary, Secondary and Tertiary object terms available to choose.

Catalogers in other countries beyond North America’s borders may find Nomenclature 4.0’s object terms useful in daily cataloging operations. It may be a useful reference tool supplementing already existing object terminology that may be incorporated into routine museum documentation practices.
Nomenclature 4.0 For Museum Cataloging includes:

  • An introductory essay featuring a Nomenclature users’ guide and a discussion of best cataloging practices
  • A list of more than 14,600 preferred object terms, organized according to a six-level classification hierarchy first introduced in Nomenclature 3.0
  • An alphabetical index of more than 16,900 preferred and non-preferred terms
  • A revised and updated users’ guide with new tips and advice
  • An expanded controlled vocabulary featuring nearly 950 new preferred terms
  • 475 more non-preferred terms in the index
  • An expanded and reorganized section on water transportation
  • Expanded coverage of exchange media, digital collections, electronic devices, archaeological and ethnographic objects, and more!
  • The content has been updated to accommodate cultural changes and evolving collections, making it easier to describe contemporary material culture as well as more traditional items.
  • Access to this up-to-date terminology ensures consistency of catalogued records and vastly improves the facilitation of sharing and retrieval of data.
  • This edition incorporates many new terms in direct response to recommendations made and needs expressed by colleagues “in the trenches” of collections and collection records management.

Connect with the Nomenclature Online Community!

Ordering Nomenclature 4.0

To order Nomenclature 4.0 For Museum Cataloging: https://rowman.com/ISBN/9781442250987

Jennifer Toelle works as the Registrar at the Smoky Hill Museum in Salina, Kansas, United States. Jennifer is a member of the American Association for State and Local History’s Nomenclature Task Force. For questions, please contact Jennifer at jennifer.toelle@salina.org

There is such a thing as too much documentation!

via pixabay, openvectorgraphicsThis may come as a shock to Rupert Shepherd and all the other folks who support the #MuseumDocumentation campaign on twitter. In fact, it was a shock for me, too. I have to elaborate a little bit to explain this:

It’s really, really hot in Southern Germany with temperatures reaching up to 40 degrees Celsius / 104 degrees Fahrenheit. Until three weeks ago I would have stated with confidence that this doesn’t bother a dyed-in-the-wool museum professional. That my brain started humming “In the Summertime” by Mungo Cherry or some other summer hit of the last 40 years whenever I seriously tried to think something through should have given me a hint that the heat had an effect. But as I already wrote a while ago a registrar’s mind is a wicked thing, so I didn’t give it a second thought.

Then it happened. I sent a chapter of my upcoming book about managing unmanaged collections to a friend who offered to cram reading and commenting on my writing efforts into her already tight schedule. She’s always very polite with her comments, so this time she suggested that maybe I should think about replacing the word “documentation” or “document” in a few instances in the following paragraph:

“As you see by these examples, your documentation strategy will look different every time, because the foundation of a good documentation strategy is to consider all circumstances that play a role in this process. It is also important to recognize that ”documentation strategy“ doesn’t mean to define a certain set of fields you will fill in your data base and totally ignore that there is other useful information contained in the objects that is worth being documented. A ”documentation strategy“ is seldom one single step after which all the documentation is done but more likely a set of steps where you first document what needs to be documented immediately and define later circumstances under which you will add further documentation. Be careful to define these ”later circumstances“, as they have the tendency of translating into ”never“ if not properly defined. In Example X it is the moment the online data base is online and the proper documentation is done by the volunteers (and preferably checked by a museum professional), in Example Y it is the time directly after the move. Preferably the order in which the objects will be documented after the move is already laid out in the documentation strategy.”

Yes, I managed to write “documentation” or “to document” 12 times in a paragraph with just 200 words! Apparently, it doesn’t make things clearer which is what documentation normally should do. I really shouldn’t write this stuff when the temperature is above 30 degrees Celsius (86 °F)…

I hope you all keep cool at those temperatures and manage your job well! Enjoy the summer!

Angela

Postscript: Oh no! Here it comes again! Alalalalalong…

This post is also available in Russian translated by Helena Tomashevskaya.

Creative Crate Recycling

Some say museum people are natural hunter-gatherers. While this may be true, it’s also true that museums always lack storage space. That’s especially a tough one for the collections manager: while the thrifty side of his or her personality wants to keep everything in case it is needed someday in the future, the logistic side tells him or her that you just can’t keep everything because you will run out of moving space, soon.

A common issue are special built crates. Made for a special purpose, i.e. letting a certain object or set of objects travel to a distant location, they are clogging space after completion of this task. Too bulky or unsuitable for longterm storage and no matter how hard you try, it seems that there is never a travel request for an object with exactly those dimensions…

There are many possibilities what can be done with used crates. Offer them to other museums is a great one, for example. Here’s another that is quite comfy: A bench made from a crate originally built for a couple of model ships.

bench2

bench3

bench1

bench

What are those objects and where do they come from?

Making The Collection of the Anna Maria Island Historical Society (AMIHS) accessible

By Ashley Burke

Throughout the country, there are local communities concerned with preserving their historic heritage. As a result, small historical societies and museums are created to help preserve this history. Many of these organizations are volunteer run and often they do not have proper museum training, especially in regards to the management of museum collections. These museums often hold collections with minimal information and as a consequence can create difficulties in future research and development.

Saving the Heritage of Anna Maria Island

AMIHS on eHiveThe AMIHS was one of those museums. It was created in 1992 by community members concerned with their changing community. Many of the long time residents were moving away or passing on and rapid redevelopment of the island had begun to take place. AMIHS set out to capture this history before it disappeared and in 1997 also started collecting historical artifacts to help tell these stories. Over the next 18 years they amassed over 1300 objects, a historic 1920s cottage and many more archives and scrapbooks still being processed.

Many years later in 2014 on one hot Florida summer day, an unknown museum person visited the collection and commented to the volunteer on duty that the museum was not being a good steward to their collections. From this moment, the museum began thinking about its collections differently and initiated a relationship with a local museum consultant (this author). The consultant was initially brought in to perform a site evaluation to outline the preservation concerns and recommendations for implementation. One of the major recommendations was to complete a full inventory and cataloging of the collections. Based on the recommendations and the evaluation, the museum chose to move forward with the cataloging project.

Cataloging – Assembly Line Style

The museum decided to close for a month and a half (during the slowest part of the year for tourism) to allow the consultant full access to the museum unheeded by volunteers and patrons. The consultant set up an assembly line type process and went room by room numbering, photographing and taking notes in a spreadsheet, as well as adding buffers and other preservation tools to better protect the objects on display. Over time, the process became streamlined and focused on the photography. A large set of objects would be laid out, then all of them numbered followed by photography and then put back on display. During the photography, the consultant would first photograph the number of the object and then photograph the object. Once the images were uploaded to the computer, the images were all renumbered to reflect the object number. This method allowed the consultant to do most of the cataloging work off site. Armed with high-resolution images of the collection, the consultant could easily add nomenclature 3.0 vocabularies and perform some web-based research.

After the collection was fully numbered and cataloged (in the end, estimated time per object came to 7 minutes), the archives and local newspaper records were consulted for any possible donor information. Since the consultant knew the collection very well at the end of the cataloging, it was easier to match up donor information to objects.

Making The Collection Accessible Online

At the end of the cataloging project, the museum was fully cataloged, numbered, and photographed, but now what should be done with all the information? A hard copy was provided to the museum for easy access, but the museum needed a computer solution that was more than just an excel spreadsheet. The museum, however, had a number of hurdles, the main one was that there was only one computer on site and it spent most of its life in the closet. There was no server and no real tech support available. The museum needed an inexpensive, cloud, web-based solution. With this information, the consultant set about researching all the available open-source and web-based collections management software solutions.

Attached is the initial report on the various systems that were analyzed (includes the cost, and a list of pros and cons). With this report and lengthy conversations with the museum, the choice was narrowed down to two choices—eHive and OMEKA. Collections items were added to both solutions and then showcased to the board of the museum. Armed with all the information, the museum choose eHive.

Once the collections management software was chosen, the museum and the consultant worked with the database company to map the data into the collections database. The AMIHS now has a useable, searchable museum collections database—one they can easily point researchers to, as well as to actively add new accessions, and add the archival data into the database.

Ashley Burke is the collections manager at the Leepa-Rattner Museum of Art in Tarpon Springs, Florida and a museum consultant for Burke Museum Services. She has over a decade of experience in museums with a variety of types of collections from fine arts to decorative arts to natural history to archeology to medical collections (including wet tissue). She has a passion for all things museum related, Florida history and is a part-time metalsmith. She makes museum inspired jewelry in her free time.

#TwitteratiChallenge

I was quite surprised when I realized that Rupert Shepherd (@rgs1510 ) nominated our project (or its English twitter branch @RegistrarTrek) in the #TwitteratiChallenge. Reading his blog post about it I learned that he was as surprised by his own nomination like I am now. Once recovered from the shock, Helen (@crazymuseumlady) nominated us in the same challenge.

Now, what’s the trouble? Registrar Trek is a project that is alive because of its various contributors, the authors as well as the translators and the readers who read, comment, like, share and tweet about it. So, seriously, who is entitled to say: “challenge accepted” in this case?

As @RegistrarTrek was nominated and I, Angela Kipp, am taking care of the English twitter account at the moment, it seems legit that I take the challenge. But that’s just where the trouble starts. My own educator days, when I explained how the Enigma worked or how coffee is made are long over. I work in the background, far away from the challenges my educating colleagues at the front-house face every day. And the ones I would first turn to when I need an educational advice are actively interacting with visitors, school children, adults, students, toddlers, questioners and vandals. I may find them doing a #tweetup but most of them and most of the time they are out there inspiring people face-to-face, not on twitter. So, I will broaden the scope of this challenge and nominate people who do great stuff and who can be found – among loads of other places – on Twitter:

My nominees

First of all I nominate @ceciliapeartree. She’s an active collections and documentation professional who keeps pace of new developments and doesn’t shy away from pondering new technologies in collections management. Besides she writes mystery novels. A lot of them. And she even brought a little drone to her session at @ERC2014. I would love to nominate her “Coolest Collections Professional Ever” (CCPE), but as this price doesn’t exist, she’s my first in the #TwitteratiChallenge.

Then, @MarkBSchlemmer who invented #ITweetMuseums a hashtag used mainly by museum professionals who visit other museums and share what they see. A whole new way of experiencing museum visits (you may also follow @ITweetMuseums).

Linda Norris @lindanorris does amazing projects around the world, writes books, has a great blog called (Brace yourself, fellow registrars and documentalists!) “The Uncataloged Museum” and a joint blog with German and Russian colleagues called “Museum, Politics and Power” which was designed for the ICOM conference 2014 but has many interesting thoughts.

My next nominees are two museum professionals who are active and inspiring tweeters: Alli Rico @alli_rico, a young emerging museum professional whom I had some inspiring collections based discussions with and who has her own blog called Alli’s Adventures in Museums and Suzy Morgan (@Kw33n5uzicus) who is a conservator, editor of the Multilingual Bookbinding and Conservation Dictionary and always fun to tweet with.

What to do?

  • Within 7 days of being nominated by somebody else, you need to identify colleagues that you rely on or go to for support and challenge. It might be a good idea to check that they are happy to be challenged so that the #TwitterChallenge chain doesn’t break down.
  • Record a video announcing your acceptance of the challenge, followed by a pouring of your (chosen) drink over a glass of ice. Then, the drink is to be lifted with a ‘cheers’ before nominating your five educators to participate in the challenge. (This is optional for the technically challenged).
  • Write your own #TwitteratiChallenge blogpost within 7 days nominating your chosen participants who then become part of #TwitteratiChallenge. If you do not have your own blog, try @Staffrm.
  • The educator that is now newly nominated has 7 days to compose their own #TwitteratiChallenge blogpost and identify who their top 5 go to educators are.
  • It’s optional to make a donation to your chosen charity but if you do you may want to identify one or two charities that may be of interest to others. For example, Debra Kidd’s highlighted the World Wide Education Project as a great charity to support or Nepal needs all the help it can get after the devastating earthquake.

The rules

There are only three rules:

  1. You cannot knowingly include someone you work with in real life.
  2. You cannot list somebody that has already been named if you are already made aware of them being listed on #TwitteratiChallenge. I realise this will get more complex over time.
  3. You will need to copy and paste the title of this blogpost, the rules and what to do information into your own blog post.

Wait, what about that video thing?

Okay, here you go:
Jpeg

  1. print out this picture
  2. cut along the white lines to get separate glass, beer and bottle opener
  3. open cut-out bottle with cut-out opener
  4. take cut-out glass
  5. pour imaginary beer
  6. say “cheers”
  7. say “I nominate @ceciliapeartree, @MarkBSchlemmer, @lindanorris, @alli_rico and @Kw33n5uzicus.”
  8. imagine me doing it on video

In the spirit of Nigel Lashbrook: inspiring people to challenge existing rules should be an integral part of education. Kudos to the educators who do!