Tag Archives: cataloging

Let’s talk about data security: How to back-up your TMS database

This is a step-by-step guide on how to backup your database if you are using a product of The Museum System (TMS) by Gallery Systems. If you use a different system it will work differently. Ask your vendor about it.

Step 1: Log into your database server and open Microsoft SQL Server Management Studio

You usually find it fastest if you start typing “SQL Server Management…” into the Windows search box.

Screenshot of the search box next to the windows icon, you can see somebody started typing "SQL..." and the option "SQL Server Management Studio 20" pops up as first choice.

Step 2: Enter your credentials

You will be prompted to enter your login credentials. If you are on NT Authentication usually all you have to do is click on “Connect”. If you have another form of authentication you will have to enter those login details. Your IT will tell you what to enter in that case.

Login screen of SQL Server Management Studio.

Step 3: Find your database

In the tree hierarchy, open the folder “Databases” and find your database. It is usually called something like “TMS”. In my case it is called “Leer”.

Screenshot from SQL Server Management studio navigation tree. The databases file folder is opened so you can see all the databases, the database "Leer" is enhanced so you can see the menues underneath it.

Step 4: Navigate to the backup menu

Right click on your database, choose “Tasks” and then “Back Up…”

Screenshot from SQL Server Management studio navigation tree. It shows the enhanced menu you get when you right-clicked on your database, highlighting Tasks and Back Up...

If that option is greyed out, you might not have the rights to do this. in which case you should talk to your IT so you get those rights.

Step 5: Chose your backup method

You will get to this screen:

Screenshot showing the options of the backup dialogue. You can see the Database chosen is "Leer", full is chosen from the dropdown, the checkbox "Copy-only backup" is unchecked, the Back-up component is "Database", Back-up to has "Disk" chosen and the box below that is empty.

Here you can choose if you want to do a full or differential backup (we talked about that here). You select that in the drop-down “Backup type”. We chose “Full” for this backup.

As a destination, usually “Disk” is fine, since you probably want to have the backup on your computer first and then transfer it to a cloud later.

Sometimes you will see a backup file already in the screen below that. If that’s the case, remove it, first.

Then click on “Add…”

Step 6: Add the file you want to back up to

Screenshot showing the window that lets you choose your destination for your backup. Selected path is "M\Backups", Files of type dropdown has chosen "Backup Files (*.bak, *.trn) and the File name entered is "AfterCI2025.bak"

By default, Microsoft suggest a rather cryptic sub-folder for your backups. I’d recommend adding a folder in a more prominent place that you can easily find and back up to there. You can see mine being “M:\Backups”.

Enter a file name for your backup. This can be the date you took it (Best Practice is to note the date in a year-month-day format so you can easily sort by date if you have multiple backup files) or a significant pointer to when you took it, for example “BeforeUpgradeTo995” if this is your backup before upgrading to a new version. Don’t forget to add “.bak” as a file ending, otherwise you might run into difficulties to restore it, later.

You can see that I called mine “AfterCI2025.bak” because it is the backup I took after adding a significant amount of information from our user conference.

Once you entered the name, hit “OK”.

Step 7: Take your backup

Screen from Step 5 again, but this time the box shows the backup file name we chose in step 6.

After that you just need to click on “OK” and your backup will be taken. If you have enough disc space in your chosen location, all is fine, otherwise it will throw an error message.

Same screenshot as before but now there is a message "The backup of database "Leer" completed successfully.

That was it. Wasn’t too hard, was it? And now you are good to go and bring your database to a safe location. I will do another post on how to compress the backup and restore it on another server.

Take your backup and take care!

Angela

How do I catalogue a smartphone app?

By Paul Rowe

Some app symbolsTraditionally museum collections were made of physical items covering everything from beetles to books, and archives to artworks. Photography collections consisted of the analogue works – negatives or prints of the photographs. The items being added to museum collections are increasingly born-digital works such as photographs taken on a digital camera or films recorded on a smartphone.

We recently had a question on our users’ forum asking for advice on how to catalogue a smartphone app. How do born-digital works fit within the traditional museum cataloguing process? Where do you start with more complex acquisitions such as software package or app?

Here are some general tips about cataloguing born-digital objects, as well as some notes on multimedia material that you might only have in analogue form (such as reels of film).

Link the source digital files

When cataloguing any born-digital works you should link the digital files directly into the catalogue. These could include a high resolution original image and smaller images derivatives if they’re used by your system. For a smartphone app, you may be able to link to still images from the user interface or a trailer/help video about the app.

You may also be able to link to web addresses for the digital material, such as GitHub source code page or Wikipedia page describing a more complex digital item such as a smartphone app.

Many systems will be able to automatically import metadata from linked files so that you have detail including creation dates and capture equipment, dimensions and duration.

Use the standard object cataloguing fields

Many of the fields used to describe traditional collections will still apply to multimedia material, including born-digital files. Typical fields that you might use are:
Object Type: a simple description of the type of material. e.g. Sound Recording, Smartphone app.

Measurements: if you don’t have duration as metadata directly in the digital file then running time and digital file sizes could be noted in the catalogue record.
Size Category: analogue film stock is usually stored in standard can sizes. These could be created as standard size categories in your system.
Display Requirements: describe the equipment required to play the recording or to use the app.
Format: e.g. Digital Video Disc, 35mm colour film, iOS app
Sound: e.g. Dolby 5.1
Colour: Technicolor
Scale: e.g. 4:3 or 1200px x 900px.
Timecodes: You can note the start and end time within an audio or video file of key clips or episodes. Each start and end time should have title or description noting the subject of the clip.
Special Features: Note features available on a commercial film release or special attributes of a software package or app.
Technical Details: Note any important technical details such as DVD Zone or Video codec.

Carriers versus Titles

Large audio or video collections often include multiple copies of the same recording. Each copy is often referred to as a Carrier. An example would be film, which the organisation may hold as a 16mm master copy, and as an analogue VHS and digital DVD copy for lending.
For larger catalogues it can be worth splitting the catalogue detail into a title record and linking this to multiple related carrier records. The title record captures the intellectual description (the title, who made it, when and where was it made). The carrier records describe details of the copies (what format are they in, where are they stored, what loans and conservation work have they been involved in). This is a more complex structure and is only necessary when large numbers of duplicate copies are managed.

Vernon CMS

This article was as a result of a question specifically about using Vernon CMS to catalogue a smartphone app. Our tips should be applicable to many similar cataloguing systems. You can read more about the Vernon Collection Management System on www.vernonsystems.com.


Paul Rowe is CEO of Vernon Systems, an New Zealand-based collections management software company. Vernon Systems develops software to help organisations record, interpret and share their collections. Paul is particularly interested in the use of web-based systems within museums and increasing public access to museum collection information. He is occasionally seen caving.
Mercury – A Tale of the Importance of Good Documentation

It’s a strange thing. The topic of hazardous materials in collections pops up every once in a while but as human beings we tend to forget about it because we consider that – of course – we know these hazards are there, but, then again, we are rather sure we know our own collection well and that if we act according to our safety precautions we are safe.
When mercury was found in the air in one of our storage areas during a pollutant analysis, I was shocked and surprised. Of course I knew we had mercury in our collection. We own a considerable number of thermometers and mercury switches. But until this day I considered our handling instructions and other precautions safe enough. This mercury was all contained, right? Yes, it was. But we never had thought of other sources, open sources that were hidden in our collection.

Discovering open sources of mercury & lessons learned

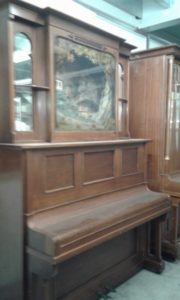
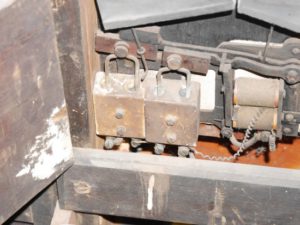
Automatic organ containing open mercury source (sorry for the poor quality of the pcture).
As we started to research our objects through the lens of “mercury” we discovered that, in fact, there were a couple of objects we never thought of. It turned out that there was an automatic organ which operated with contacts that dipped into mercury in some ceramic containers. In our medical history collection we had devices for counting thrombocytes in blood samples that operated with open mercury. However small, given that mercury evaporates at room temperature, even small outlets are an issue! There were barometers and even chronometers with open mercury sources. It was quite an effort to find out which sources we had. Even more to either remove or contain the mercury and seal and label the contaminated objects properly.
We learned quite a few lessons along the way:

  • Never assume you know everything about your collection
  • Never assume your policies and procedures cover every aspect
  • Never assume that you are safe, keep an eye on recent research

But maybe the most important lesson was about the importance of good documentation. And we learned it the hard way.

All expert knowledge at hand, but still…

Looking back, if someone had thoroughly researched the working principles of said objects, he or she would have discovered that they needed mercury to work. We don’t know if someone knew this when the objects were acquired. At least whoever did it, didn’t mention that they contained mercury in the documentation and the catalog entry.

Mercury switch inside of the automatic organ
It’s the disconnected working processes that are the real health hazard here! When we look at the classical museum setting there are different people with different knowledge involved in the documentation process. People whose skillsets are perfect matches but all their knowledge is useless if it isn’t interlinked in the workflow:
The curator might know best that mercury was necessary to make an object work, but might not be aware that mercury is a problem. The conservator has, due to his or her education, deep knowledge about dangerous substances but not about the object and might not see the object before it is stored if it is in good condition. Even if he or she checks its condition before it goes off to storage, the mercury might be hidden inside, so the conservator isn’t aware of the danger. The collections manager has some knowledge about dangerous substances but not about the object and might not be able to spot the danger if it isn’t widely known to his/her profession (like arsenic in taxidermied specimen is). The database manager has the knowledge about how to make dangerous substances retrievable in the database and maybe even know how to label them properly, but again, as he or she doesn’t have knowledge about the object, he or she doesn’t know there’s a problem.
Although all the experts work for the same institution, if they don’t assess the object together and bring their knowledge together, they are likely to overlook a danger and impose a health risk on colleagues, future researchers and visitors.

The importance of knowledge in cataloging

It is also obvious how dangerous it is when whoever is doing the catalog entry doesn’t have indeep knowledge about the objects. There is a tendency in museums to think that cataloging is a task that can be done by “whoever”. Knowledge isn’t important, every intern can key in a short description and some measurements, right? Of course we all know that’s nonsense, but arguing against it is tough. It’s hard to communicate what damage it does if dates, measurements and categorizations aren’t correct. With hazardous materials the danger should be obvious: someone doing the catalog entry who hasn’t enough knowledge to understand the working principles is likely to overlook the danger and therefore imposes a life threat to his or her colleagues and visitors.
If the curator can’t do the catalog entry him-/herself for a good reason (And: no, being too lazy/old/busy to learn how to do it isn’t a good reason, at least in my book!) he or she has to share his/her knowledge about the object with whoever does the catalog entry.

How to do it better

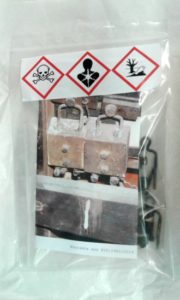
Objects containing mercury labeled according to international standards.
There are a few things that can be done to avoid unpleasant surprises:

  1. When an object is acquired, consult with everyone involved in the process. All the expert knowledge at one table will help to discover as many potential hazards as possible.
  2. If you are a one woman/man museum, make sure to reach out to experts in your area, your regional museum association or international experts via listservs and online groups to learn about the possible dangers your new acquisition contains.
  3. If the hazard is new, define safety precautions in handling and storage. If the hazard is long known, make sure your handling and storage precautions are still up to date with current research.
  4. In the database: make sure the hazardous material is named. In an ideal setting you do have a thesaurus of dangerous substances to pick from which are linked to safety precautions and correct labeling.
  5. In the database: make sure an object that contains dangerous substances is clearly distinguishable from other objects so everybody is aware that there might be special handling and storage precautions.
  6. In the storage: label dangerous substances according to international standards.
  7. In the storage: store hazardous materials according to the safety precautions. This might involve special containers or rooms with a ventilation system and handling instructions clearly visible on the container.

Live long and prosper!
Angela Kipp