In the last post I recommended OpenOffice Calc by Apache (https://www.openoffice.org/product/index.html) to use as the go-to spreadsheet software, but for those of you who might have the Microsoft Office Suite anyway, here we have the same in Excel:
Instead of opening our “MyLogger.csv” (which would mess up the data pretty badly), we first create a new spreadsheet. Then we choose the “Data” panel and “from text”. We choose our file and hit “import”. We choose the option that we have “separated” values. Then we hit “next”.
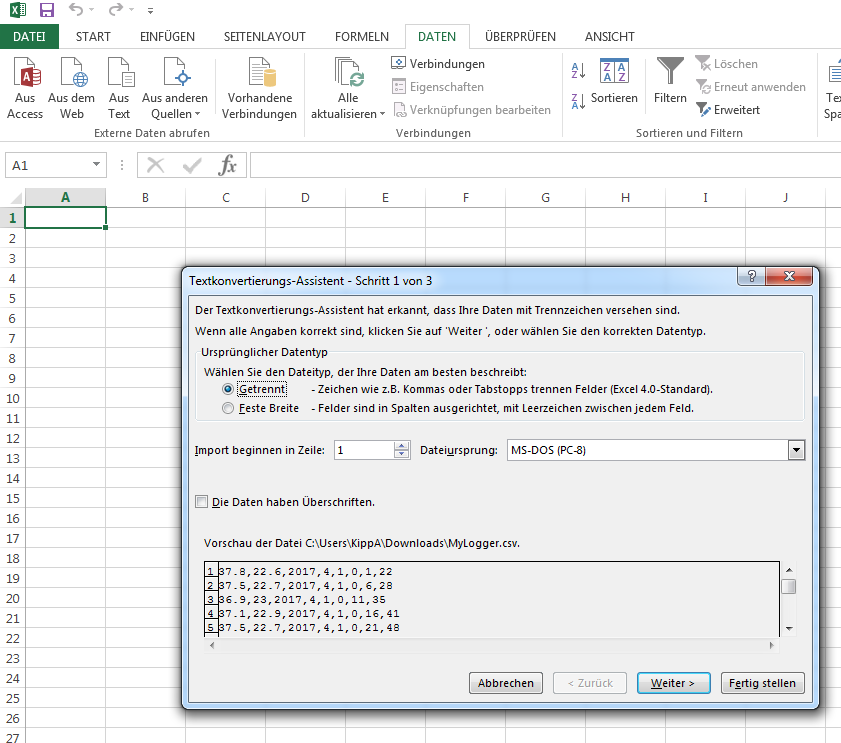
The next window allows us to specify how our values are separated. In our case they are separated by a comma.
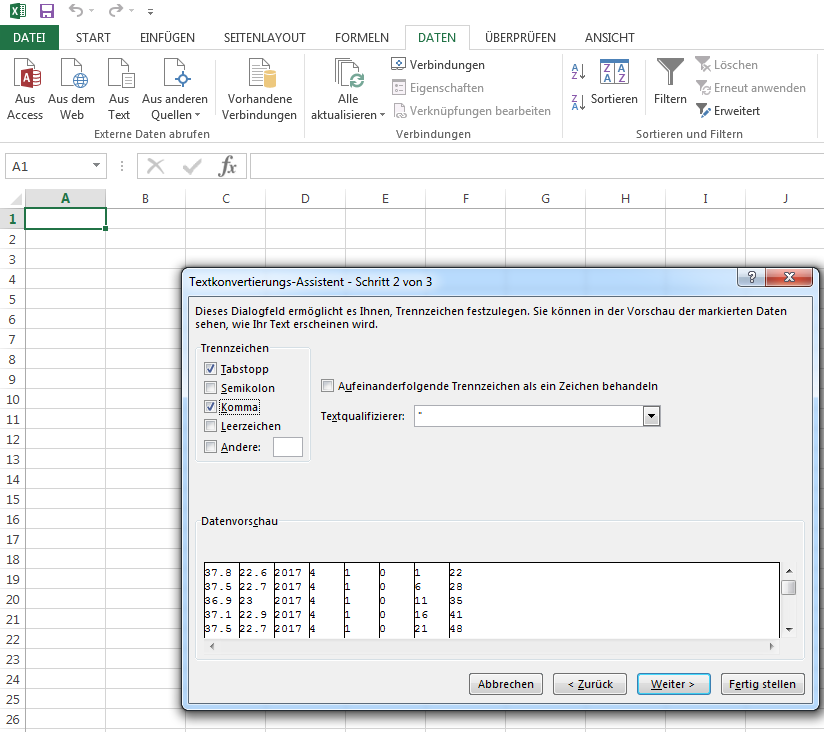
After we hit next, we got the option to choose a format for our values. Easy to screw your data if you choose the wrong one. In most cases, you can leave it set to “standard”.
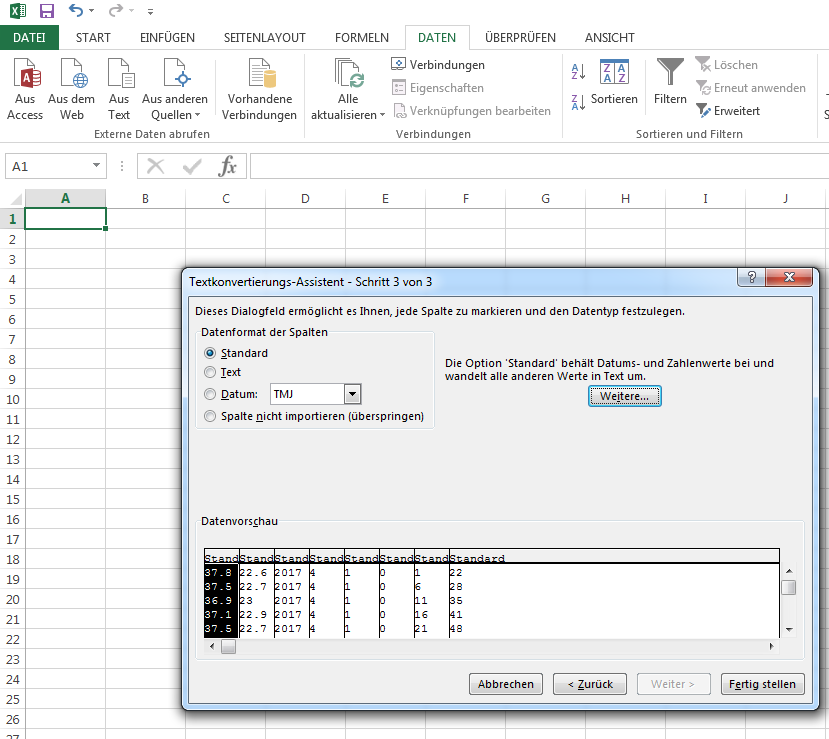
There is a special trick to shoot yourself in the foot if you are working with another language package than the English one. In German, the seperator for decimals is the comma, not the point. In the German language package Excel won’t recognize your decimals as decimals if you leave the “.” from the original software and do all kinds of funny things with them, like forgetting everything after the point or not interpreting your numbers as numbers. You have to choose the decimal separator for each column in the “Options…” field.
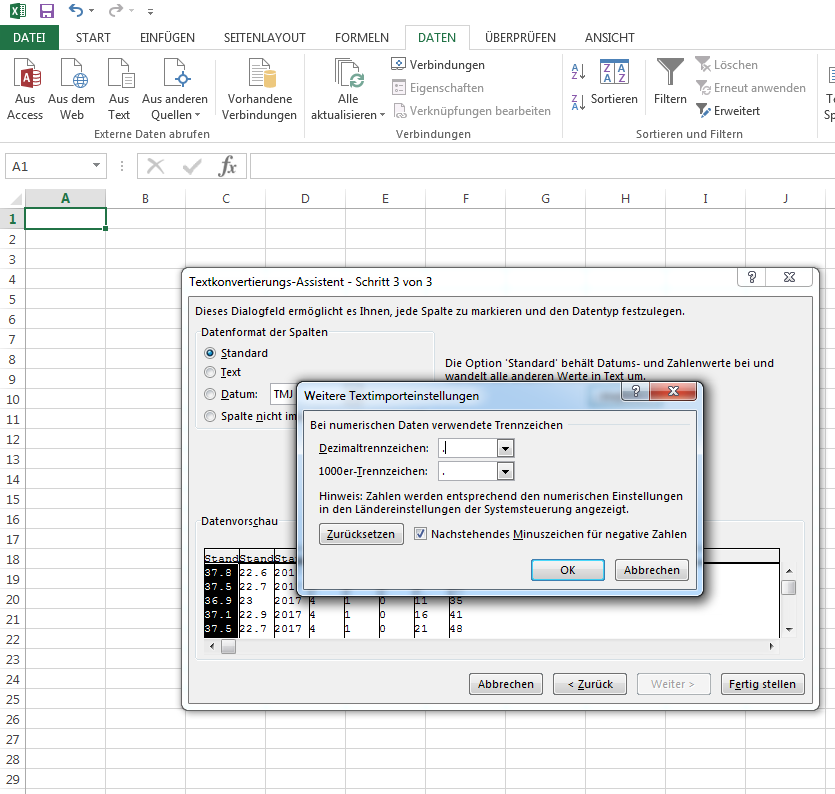
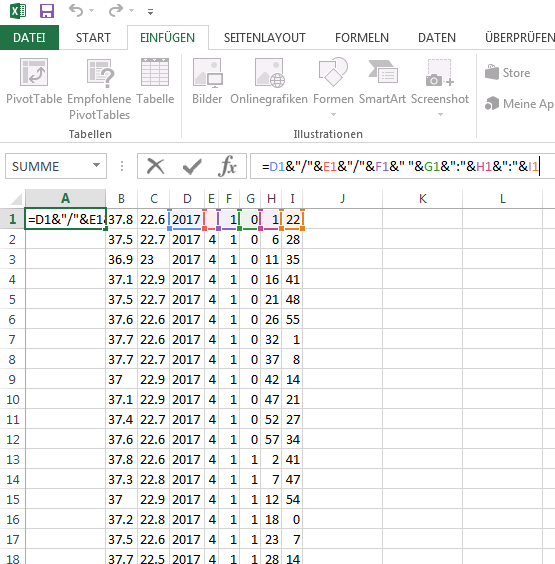
When you hit finish you get another dialog where you just hit “ok”. Now you do have the data in your spreadsheet. We proceed much like we did in Calc. We will add a new column at the beginning for our timestamp. We create the time stamp by joining our data in the right format: We put our cursor in A1 and type “=” which indicates the beginning of a formula. Then we type in the first field “D1”, place an “&”to join it with the next piece we need, which is a “/”. We type that in quotation marks because otherwise our software will interprete the / as a division. We add the next field, which is E1, with & and so on. After 6 fields, two “/”s, a blank and two “:” we have:
=D1&”/”&E1&”/”&F1&” “&G1&”:”&H1&”:”&I1
When we hit enter, we should see a nice, clean timestamp in A1:
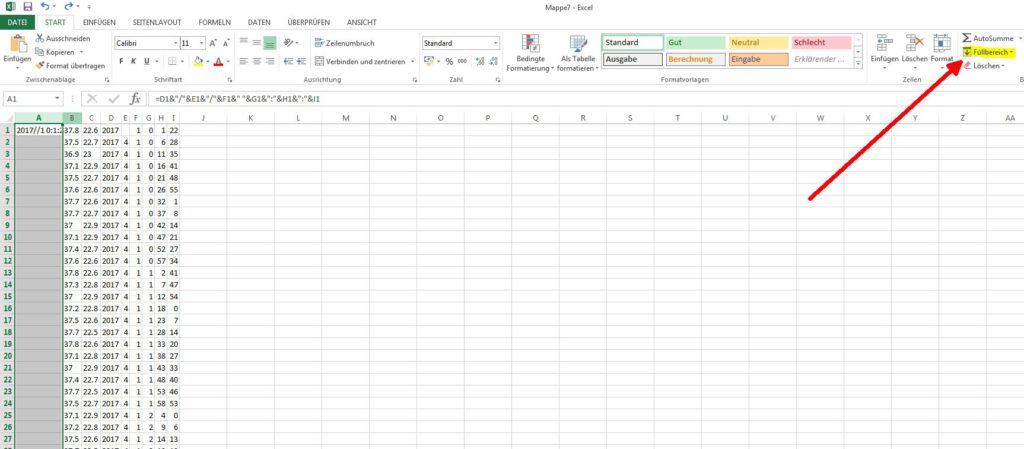
Now we want this in our whole A column. We look how many rows of data we have, which in this case is 8484 rows, yours might differ. We now go to the address field, write “A1:A8484” and hit enter. This tells Excel that we want to do something in all A fields from A1 to A8484. That’s why these are marked now. Next up we go to the “start” menu and choose the “fill” option on the far right of our screen. There we choose “down”. Now all our data sets have a nice timestamp made from columns D to I.
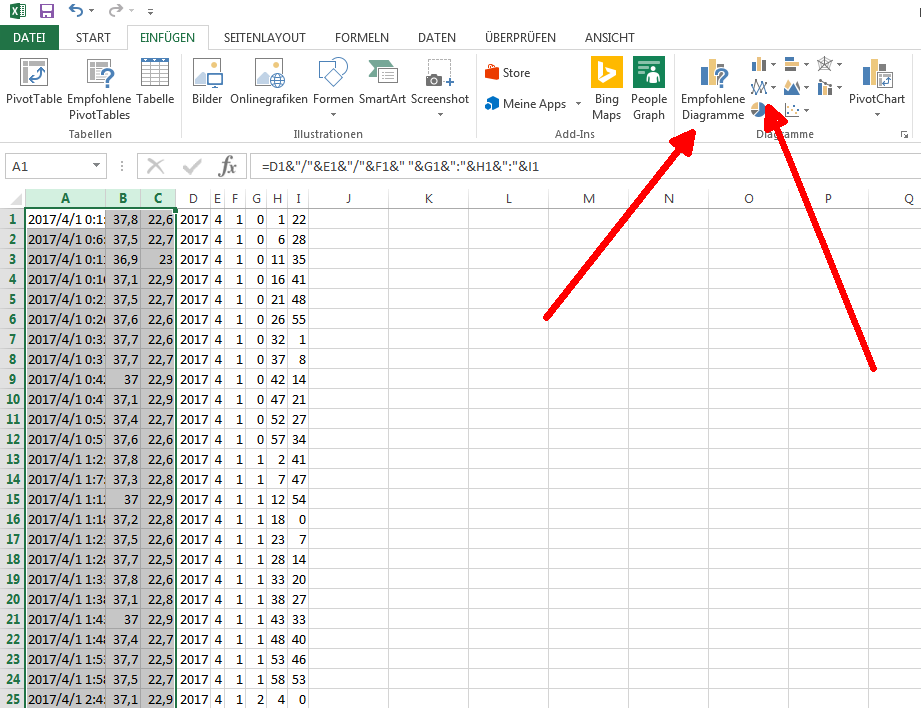
Ready to have a nice diagramm? Okay, here we go. You first mark the colums A to C which hold all the data we want to see in our graph. Then we choose the diagramm option from the “Insert” menu. You can either go to “recommended diagramms” or directly choose “lines”.
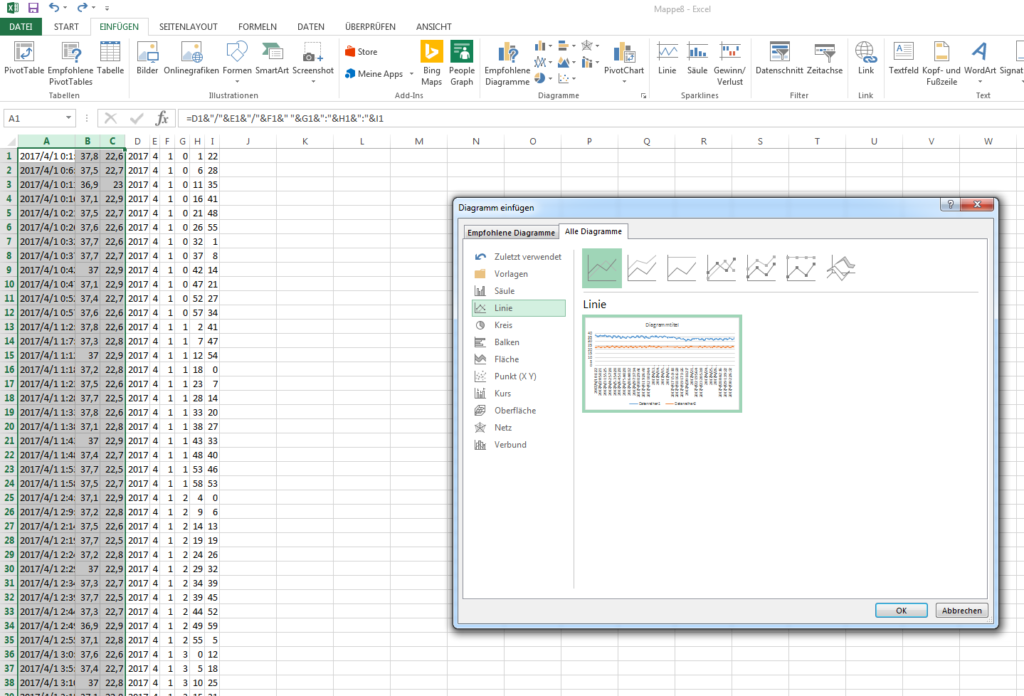
If you hit “lines” your graph will be generated on the spot, otherwise you can look at the recommendations and play around with them:
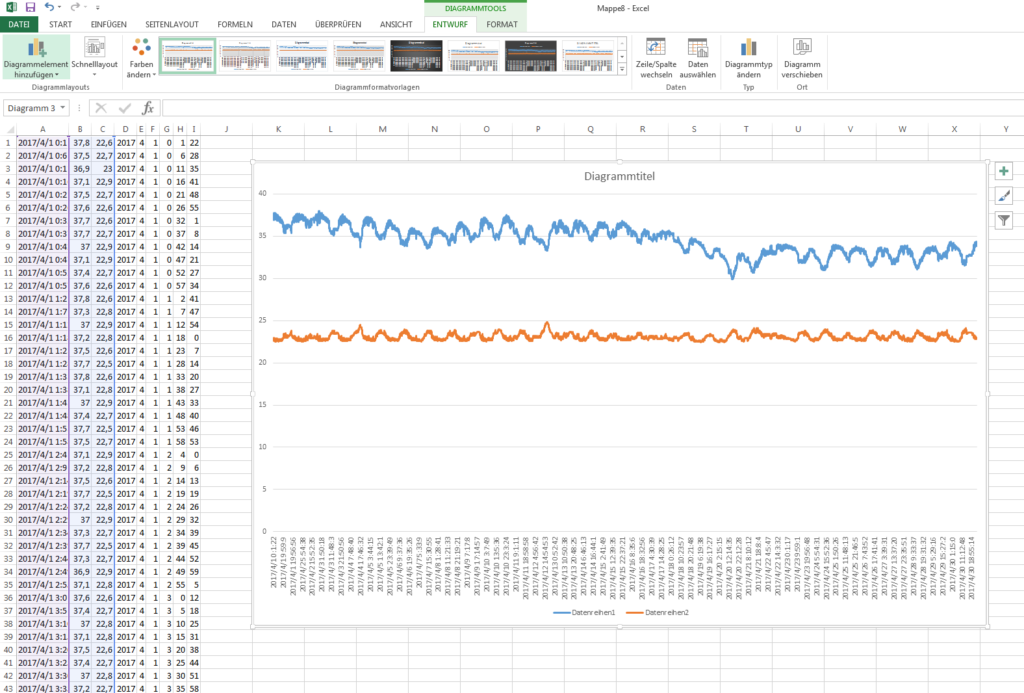
Now we have a nice diagramm to enhance, rename and play around with:
So, now Calc and Excel users are on the same page, so next up we can do some nice things with our data…
Read the other posts for this project:
- Build Your Own Data Logger – Investigating Your Climate Graphs
- Build Your Own Data Logger – We Want Fahrenheit!
- Build Your Own Data Logger – Processing Data With Microsoft Excel
- Build Your Own Data Logger – Processing Data with OpenOffice Calc
- Build Your Own Data Logger – The Software, Telling the Logger to Log
- Build Your Own Data Logger – Arduino, the Datalogger-Shield and the Wiring
- Build Your Own Data Logger – The Sensor, Heart of the Logger
- Build Your Own Data Logger – Quick Start Guide